7- Wrap Up Example #1
Let us start by
sketching the Budgeting Cycle in a white paper. We are lucky. Business adopts the Top down Budget model. They just negotiate the Budget at the top and enforce it on the departments. Maybe this model is bad for them, but it is good
for us.


Here we have only one
Input Budget Form, a “Layout”. We have
two steps "Stages", first one is Submission and the second is approval. In brief, "Layout" is going into two steps “Stage”.
this example is just Simple introductory example. It should explain some main concepts and basic configurations. later things will get far more complicated. We should do the following,
- Build a Budget Hierarchy
- Build a workflow.
- Create two stages.
- Create a Scenarios, Columns and layouts.
- Create a Budget process.
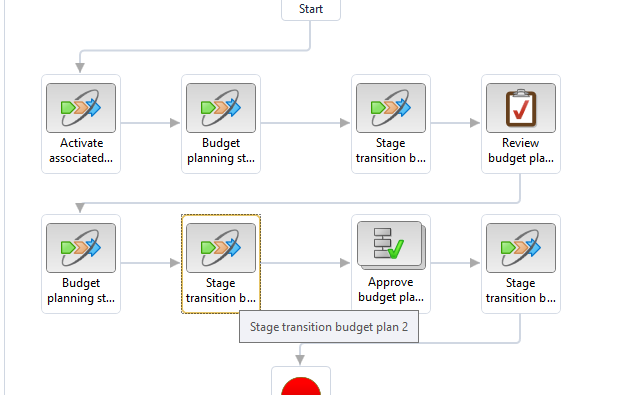
Step #1
We need the simplest
workflow with one transition task
Step #2
Create two Stages ,
note, one transition task should take you from one stage to second . so when we have one transition task we should have 2 stages. when we have 2 transition task we should have 3 stages. when we have 3 transition tasks we should have 4 stages and so on.
note, one transition task should take you from one stage to second . so when we have one transition task we should have 2 stages. when we have 2 transition task we should have 3 stages. when we have 3 transition tasks we should have 4 stages and so on.
Step #3
Link the stages to the workflow
Step #4
Create one Scenario
Step #5
Create one Column
Step #6
Create layout and add the Column we just created,
Step #7
Create a Budget Process,
Note here, that the Hierarchy does not move the process. It only grant access to a specific user based on the Assigned responsibility
Center. and it is useful when creating Sub plans to Users as we should see later.
In the Hierarchy, we set the Finance at the top and below that is the other departments. However, this will not affect the flow at all. The flow is driven by the workflow.
In the Hierarchy, we set the Finance at the top and below that is the other departments. However, this will not affect the flow at all. The flow is driven by the workflow.
Do not forget to activate,
Let us see it in Action Now,
Step #1
Open Budget planning work space and Select Demo process we created,
Step #2
Select from the Responsibility Centers available. According to
the User Security this list should be populated.
remember that we assigned the workflow on the level of the Responsibility Center. This means that every responsibility center has its own flow. this allow us to design the workflow as per the Internal Cycle and Approvals per Center. we should consider that when we design our Hierarchy at the very Beginning.
remember that we assigned the workflow on the level of the Responsibility Center. This means that every responsibility center has its own flow. this allow us to design the workflow as per the Internal Cycle and Approvals per Center. we should consider that when we design our Hierarchy at the very Beginning.
and again to make it clear, In the Workflow, we have just Build one transition auto task
that is all. No assignment, no rotation, no allocations, nothing. Just one
User Submit, change the Stage.
In the Hierarchy, we add the Finance at the top and other
departments below. This does not mean that when a user submit a request
it should go to the finance.
No, it will only affect security of this user and the responsibility center drop down list values available for him and as well the distribution of Budget plans as we should see later.
No, it will only affect security of this user and the responsibility center drop down list values available for him and as well the distribution of Budget plans as we should see later.
Step #3
Fill up the Budget plan

Step #4
Click Submit
Not the Name Of the Work flow “Auto Approve”
Step #5
Follow up on the Workflow history, Click On Workflow History,
Still in the queue,
Give it some time and Check again,

That is it.
No rotation, no Assignment, no Sub plan , no Allocation … Don't worry , Lot of Excitement coming Next
….
Finally, remember the difference between the Hierarchy and the workflow . and remember that we add the Workflow for each component of the Hierarchy. it is as if the workflow is actually apart of the Hierarchy. it allow us to Build a workflow for every responsibility center by itself. this give us the ultimate flexibility to apply the internal process of each department. and actually avoid lot of conflict .


Comments
Post a Comment